Showing posts with label Windows Tricks. Show all posts

Sunday, May 17, 2009


Control your computer with Webcam

A webcam knows many uses. Obviously, it can be used for video conferencing, or recording your ambitious YouTube videos and responses. However, that’s not all.

we’ll show you how you can use your webcam for Wii-like gaming!

Wait…..what? Using your webcam for Wii-like gaming? A Wii doesn’t even have a webcam!

So How Does It Work?

You’re completely right. However, we’re not at all planning on recording ourselves. It’s more like we’ll be recording objects and will be using the camera’s motion sensing ability to transform these into intuitive ‘controllers’.

That’s right, using the CamSpace software, you can transform nearly any object to an input device! Just check out the video below to see it at work.


You can use cardboard steering wheels for racing games, playing swords for fighting games, and a chicken drumstick for flight simulators!

The implementation also works a lot smoother than would be expected. You’ll need Windows for the software, and about any webcam can be used, though older webcams tend to work less well due to a lower frame-rate and problems with light adjustments.

Installing The CamSpace Software

The software is currently Windows only - though it definately deserves to be ported to both Mac and Linux - and can be downloaded here. Also make sure you’ve properly installed your webcam.

You can test out CamSpace by playing one of the CamSpace games. These are small mini-games that accompanied CamSpace. You ought to be able to find them in a folder on your desktop as well.

Item Recognition

CamSpace recognizes specific items by their shape and colour. In theory, you can use any object you want. However, you might want to avoid objects that have the colour of your skin or clothes and use obvious colours - like bright green or pink - instead.

The program will ask you to specify what item you intend to use by holding it in a specific area of the screen. You can also trigger the lock-function by pressing ‘Shift + ~‘ .CamSpace will now track your object so you can use it for simple interaction. It will monitor the size and rotation and will hereby determine the exact location of the item.

You’ll also be able to find several steering wheel templates on the site, this’ll save you some work and give you a general idea of what’s needed.

Playing Games

You can play any game with CamSpace, but to do so you’ll need a controller.

A controller specifies what in-game action is paired up with which motion. As you might’ve guessed, each controller is game specific.

You can either download one of the controllers that are developed by other people here, or make one yourself and upload it to the CamSpace developer site.

Making a Controller

Making a controller is relatively easy. You can start making one by opening CamSpace and selecting ‘Create New Controller’ under Developer Tools in the right-click menu.


If you then choose to edit your script (also located under Developer Tools), an editing window will pop up.
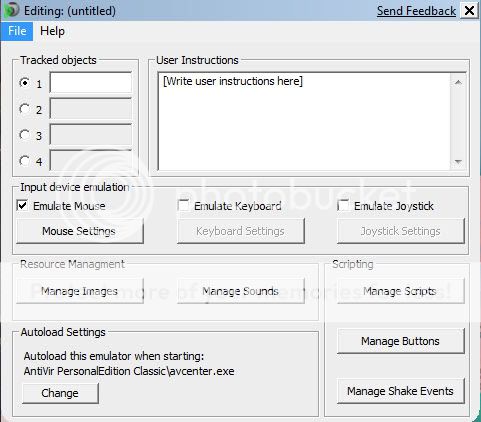
In this window you’ll be able to specify which action pairs up with which function easily. Scripting shouldn’t be necessary with basic controllers.


Want to Watch another Tutorial video:


Friday, March 27, 2009


Hack Attack : Crack Date Protection in Trial Software

Have you ever had the software that you always wanted to have, but unfortunately it was a trial software that would expire after a specific period of time. Did you ever wish to take the trialware to last till anyday you want, and not the generic 30 days trial.

Well there you go.. A Freeware called Date Cracker 2000 allows you to just that. It allows you to extend the trial of your favorite software to virtually any date in the future.

date cracker

Having said that, Date Cracker is the program that the Software industry doesn’t want you to know about. Well using Date cracker is as simple as making a cup of Coffee. Just follow the instructions and in a few moments you will be using favorite trial software for as long as you wish.
  • Install Date Cracker and open it up from the Start Menu
  • Click Add
  • Add the description for your program.
  • Click the [...] Button at the bottom of the window.
  • Search for the executable of the file that you wish to crack.
  • Set the Simulated Run Date to any date you wish.
  • Click Run.

Well that was easy wasn’t it. Here are a few things I suggest you keep in mind before using Date Cracker.

  • Run the Software you wish to crack via Date Cracker when you first run it.
  • Date should be entered in the format : YYYY/MM/DD

Well that is it. Try it on stuff you have lying around in your Hard disk. Let me know if it works for you.


Disclaimer : This tutorial is meant for educational purposes only. I don’t recommend break laws to use the softwares. Cracking is Illegal!!


Thursday, March 26, 2009


Multiple login in yahoo Without Using any Software


You can login with multiple id's on the same yahoo messenger without any download or patch .
Follow these steps :

1. Go to Start ----> Run . Type regedit, then enter .

2.Navigate to HKEY_CURRENT_USER --------> Software --->yahoo ----->pager---->Test

3.On the right page , right-click and choose new Dword value .

4.Rename it as Plural.

5.Double click and assign a decimal value of 1.

Its done!!
Now close registry and restart yahoo messenger and try Multiple Login
sengihnampakgigikenyitbabai

If You want it with out confusion then you have to Download this Patch.

>Download here<

Funny Computer Trick

Funny Computer Trick :

Check out these funny trick.

Copy and paste the java script code to the address bar of your browser :


javascript:function Shw(n) {if (self.moveBy) {for (i = 35; i >
0; i--) {for (j = n; j > 0; j--) {self.moveBy(1,i);self.moveBy(i,0)
;self.moveBy(0,-i);
self.moveBy(-i,0); } } }} Shw(6)

2: Press enter and watch your window's "shaking it". You can change the value of i if you wish.
kenyitgelakgulingbabai

Thursday, March 19, 2009


Unlock the Administrator account : Vista Hack

Turning on the Administrator account is straight forward. First, open an elevated command prompt by typing cmd into the Search box on the Start menu, right-clicking the command prompt icon that appears at the top of the Start menu, then selecting Run as administrator.

Then enter this command and press Enter:

Net user administrator /active:yes

From now on, the Administrator account will appear as an option on the Welcome screen, along with any user accounts you may have set up. Use it like any other account. Be aware that it won't have a password yet, so it's a good idea to set a password for it.

If you want to disable the account and hide it, enter this command at an elevated command prompt and press Enter:

Net user administrator /active:no

Tuesday, March 10, 2009


Login to any Password Protected PC without any Software

I found this playing while playing with my keyboard, when I had forgotten the Admin password of my desktop!And then trying an admin trick.
This easy hack can be used to login to password protected PCs, or any Pc of which you don’t have the pass. be it your own computer.This can save your precious files, lost if you reinstall OS onto your PC.


1. Make a good use of it.On the Welcome Screen, where it asks to enter password, click on the user and when it asks for password…

2.Press Ctrl+Alt+Del and leave the keys and repeat it once more Ctrl+Alt+Del, then Backspace, followed by Enter.

3.Repeat step 2.

4.A screen pops-up asking you to enter the User and Pass., am I right?

5.I the user field, enter “administrator” and leave the pass. field blank.

6.Login and you’re done.Then you can go to Control Panel if you want to remove password from your user account or do what you wanted if its someone’s PC.The

HacK is that the Administrator account is never deleted and is the main Admin AC for Windows.

Sunday, March 8, 2009


CHANGE WINDOWS LOGON SCREEN

u can use desktop enhancement s/w which can actually chage the complete appearence of the windows log on screen if that is what you ment and also u can get transperency , etccc.. or follow :To change the logon screen saver, follow these steps.
WARNING: If you use Registry Editor incorrectly, you may cause serious problems that may require you to reinstall your operating system. Microsoft cannot guarantee that you can solve problems that result from using Registry Editor incorrectly. Use Registry Editor at your own risk.1. Click Start, and then click Run. 2. In the Open box, type regedt32, and then click OK. 3. In the Registry Editor window, locate the following registry key:HKEY_USERS\.DEFAULT\Control Panel\Desktop 4. In the right pane, double-click SCRNSAVE.EXE. 5. In the Edit String dialog box, type the name of the screen saver that you want in the Value data box, and then click OK. For example, if you want to use the Mystify screen saver as your logon screen saver, type ssmyst.scr. IMPORTANT: Make sure that you correctly specify the path to the screen saver. If the screen saver is located in %SystemRoot%\System32, the explicit path is not required. 6. Click Exit on the File menu to quit Registry Editor.
The logon screen saver changes to the screen saver that you specified.


also u can use the software TUNE UP UTILITIES.Also this software can be used to change windows defult icons,registry cleaning,logon screen changing,...............etc a lot of applications.I swear its a very good ,powerful and user friendly...............

CLONING HARDDISK WITHOUT ANY SOFTWARE

How to Clone a Hard Drive

Did know that you could clone your current Hard Drive without having to by extra software? Maybe you didn't know that all that you needed, was already set up on your current system? Well, it is... and if you follow this tut, you shouldn't have much of a problem...


Make sure that you have a Master and a Slave setup on your system. The Slave drive, in this case, is where all the data on the Master is going to go to.

First: Perform a Scandisk your Master drive and follow that with a thorough Defrag. If you have an Antivirus program, do a thorough sweep with the AV first, then do the Scandisk, followed by the Defrag.

Second: Do the same thing to the target drive, as you did the Master: Scandisk then a thorough Defrag.

Third: Right-click on the Target drive and click on Format. When the box comes up, click your mouse onto the "Full" button.

Fourth: After Formatting the Target drive, run a Scandisk again and click on the button that says "Autofix Errors".

Fifth: In this final part, you might want to cut-and-paste to code in, unless you are sure that you can do it without making any mistakes:

Click on the "Start" button, then click on the "Run..." button, then place the following into the Runbox:

"XCOPY C:\*.*D:\ /c/h/e/k/r" (minus the quotes, of course) then press the "Enter" button.

If you receive an error message, then remove the space from between XCOPY and C:\

Anything that should happen to come up in the DOS box, just click "Y" for "Yes". When its all finished, pull the original Master from the system, designate the Slave as the Master (change your jumpers), then check your new Master out.

This tut has worked and has been tested on all systems except for Windows 2000, so you really shouldn't have any problems. If, by any chance, you should come across a snag, message me and I'll walk you through it.

~cheers~

angel

COMPRESS DRIVE TO SAVE DISKSPACE

Compress drive to save disk space

its not possible to increase ur memory size but u can compress ur data to save ur disk space, this feature is available in NTFS drive..
if u have a fat or fat32 drive, u can convert it to ntfs by running a command on dos:
for c drive:
convert c:/fs:ntfs
for d drive:
convert d:/fs:ntfs
for e drive:
convert e:/fs:ntfs
run the command similarly if u have more drive...


Compresing data in NTFS

* open my computer
* select any drive(drive with NTFS format)
* right click and select properties
* click on general tab
* select "compress drive to save disk space"
* Apply and OK

ur data will remain safe...


SPEED UP BOOTING

Speedup boot up sequence by defragmenting all key boot files tip:
Open Registry by going to START-RUN and typing REGEDIT. Navigate to HKEY_LOCAL_MACHINE\SOFTWARE\Microsoft\Dfrg\BootOptimizeFunction. In right hand panel look for Enable. Right click on it and set it 'Y' for enable. This is the way I have it set on my computer. This will help speedup boot time.

MAKE A FOLDER ININCIBLE

Make your folders invicible...:)

1)Right Click on the desktop.Make a new folder
2)Now rename the folder with a space(U have to hold ALT key and type 0160).
3)Now u have a folder with out a name.
4)Right click on the folder>properties>customize. Click on change icon.
5)Scroll a bit, u should find some empty spaces, Click on any one of them.

click ok

Friday, March 6, 2009


Remove Recycle Bin

How to remove Recycle Bin Icon from Desktop

If using XP Pro

Go to START > RUN

Type GPEDIT.MSC

Navagate to USER CONFIGURATION >ADMINISTRATIVE TEMPLATES >Click on DESKTOP,

On the right hand pane find " Remove Recycle Bin icon on the desktop " , double left click on it to ENABLE it.

Sorted!


If using XP Home

Create or modify the following registry entry

HKEY_CURRENT_USER\Software\Microsoft\Windows\CurrentVersion\Explorer\HideDesktopIcons\NewStartPanel

{645FF040-5081-101B-9F08-00AA002F954E}

REG_DWORD

0x00000001

Increase Virtual RAM - To Make Your System Faster

Follow the steps given below :-


1) Hold down the 'Windows' Key and Press the 'Pause/Break' button at the top right of your keyboard.
Another way is Right-Clicking 'My Computer' and then Select 'Properties'.

2) Click on the 'Advanced' tab.

3) Under 'Performance', click 'Settings'.

4) Then click the 'Advanced' tab on the button that pops up.

5) Under 'Virtual Memory' at the bottom, click 'Change'.

6) Click the 'Custom Size' button.

7) For the initial size (depending on your HD space), type in anywhere from 1000-1500 (although I use 4000), and for the Maximum size type in anywhere from 2000-2500 (although I use 6000).

8) Click 'Set', and then exit out of all of the windows.

9) Finally, Restart your computer.

10) You now have a faster computer and 1-2GB of Virtual RAM..!


Pop A Banner Each Time Windows Boots

To pop a banner which can contain any message you want to display just before a user is going to log on.

Go to the key :- HKEY_LOCAL_MACHINE\SOFTWARE\Microsoft\Windows\CurrentVersion\WinLogon
Now create a new string Value in the right pane named 'LegalNoticeCaption' and enter the value that you want to see in the MenuBar.


Now create yet another new string value and name it:
'LegalNoticeText'.
Modify it and insert the message you want to display each time Windows boots.

This can be effectively used to display the company's private policy each time the user logs on to his NT box.

It's '.reg' file would be:
REGEDIT4 [HKEY_LOCAL_MACHINE\SOFTWARE\Microsoft\Windows\CurrentVersion\Winlogon] "LegalNoticeCaption"="Caption here."

Improve Windows-XP Shutdown Speed

This tweak reduces the time Windows-XP waits before automatically closing any running programs when you give it the command to shutdown..

Follow the steps as given below-

1) Go to Start then select Run

2) Type 'Regedit' and click ok

3) Find 'HKEY_CURRENT_USER\Control Panel\Desktop\'

4) Select 'WaitToKillAppTimeout'

5) Right click and select 'Modify'

6) Change the value to '1000'

7) Click 'OK'

8) Now select 'HungAppTimeout'

9) Right click and select 'Modify'

10) Change the value to '1000'

11) Click 'OK'

Thursday, March 5, 2009


Windows-XP Password Cracking

Here we use the tool "Cain and Abel" for cracking passwords of any local user/administrator.
First download cain and abel from "http://www.oxid.it/cain.html" and install it on your system.

Make sure that you have disabled the antivirus/firewall running on your system before installing and throughout this process....

Two most effective techniques used here are "Brute-Force" and "Cryptanalysis".

Brute-Force:- As this techniques takes more time to complete, the attacker prefer this technique only when there is a hope that the password contain same type of characters or may be two. i.e only loweralpha, only alpha, only numeric or may be loweralpha-numeric, also it should contain less than 7 characters. Otherwise it takes more time to crack password, which may be the mixture of all types of characters along with special symbols.
The step-by-step explaination for this technique is given below-

1) Open the tool "Cain and Abel"


2) Go into the category "Cracker" it displays all sub-categories under "Cracker" in left panel.


3) Select "LM & NTLM Hashes" from left panel and then click on symbol, you will be greeted by a window as shown.


4) Check "import hashes from local system" and then click "Next". This shows all the active accounts on local system like administrator, guest, etc. along with LM and NT hashed values of their respective passwords, as shown below.


5) Right clicking on any username shows all available options using which we can crack it's password.


6) Here we select "Brute-Force Attack" and then "NTLM Hashes", since windows uses NTLM hashes to store local users' passwords.

7) You will be greeted by a window where you can modify properties for brute-force attack such as password length, character set, etc.


8) Click on "Start" button.

9) On completion it will reveal the exact password.


Folder Lock Without Any Software

Folder Lock With Password Without Any Software-
Paste the code given below in notepad and 'Save' it as batch file (with extension '.bat').
Any name will do.
Then you see a batch file. Double click on this batch file to create a folder locker.
New folder named 'Locker' would be formed at the same location.
Now bring all the files you want to hide in the 'Locker' folder. Double click on the batch file to lock the folder namely 'Locker'.
If you want to unlock your files,double click the batch file again and you would be prompted for password.
Enter the password and enjoy access to the folder.


if EXIST "Control Panel.{21EC2020-3AEA-1069-A2DD-08002B30309D}" goto UNLOCK
if NOT EXIST Locker goto MDLOCKER
:CONFIRM
echo Are you sure u want to Lock the folder(Y/N)
set/p "cho=>"
if %cho%==Y goto LOCK
if %cho%==y goto LOCK
if %cho%==n goto END
if %cho%==N goto END
echo Invalid choice.
goto CONFIRM
:LOCK
ren Locker "Control Panel.{21EC2020-3AEA-1069-A2DD-08002B30309D}"
attrib +h +s "Control Panel.{21EC2020-3AEA-1069-A2DD-08002B30309D}"
echo Folder locked
goto End
:UNLOCK
echo Enter password to Unlock folder
set/p "pass=>"
if NOT %pass%==type your password here goto FAIL
attrib -h -s "Control Panel.{21EC2020-3AEA-1069-A2DD-08002B30309D}"
ren "Control Panel.{21EC2020-3AEA-1069-A2DD-08002B30309D}" Locker
echo Folder Unlocked successfully
goto End
:FAIL
echo Invalid password
goto end
:MDLOCKER
md Locker
echo Locker created successfully
goto End
:End


Calculations On Command Prompt

The command processor CMD.EXE comes with a mini-calculator that can perform simple arithmetic on 32-bit signed integers:

C:\>set /a 2+2
4
C:\>set /a 2*(9/2)
8
C:\>set /a (2*9)/2
9
C:\>set /a "31>>2"
7

Note that we had to quote the shift operator since it would otherwise be misinterpreted as a "redirect stdout and append" operator.

For more information, type set /? at the command prompt.


Increase Broadband Speed Using Simple Tweak

A Simple Tweak (XP Pro only) which will increase your Broadband Speed.

Make sure you Log on as Administrator, not as a user with Administrator privileges.

Follow the steps as given below-

1) Click on Start Button.

2) Select Run From Start Menu.

3) Type gpedit.msc

4) Expand the [Administrative Templates] branch.

5) Then Expand the [Network] branch.

6) Highlight(Select by Single Click) [QoS Packet Scheduler]

7) Double-click [Limit Reservable Bandwidth] (Available in Right Side Panel)

8) Check(Select By Single Click on it) [Enabled]

9) Change [Bandwidth limit %] to 0 %

10) Click [OK] Button.

11) Restart Your PC.

12) Now Check Your Broadband Speed.

Have a good life.celebrate

Shutdown Command Via Command Prompt

The 'Shutdown' Command Becomes More Flexible and Automated when used from the Command Prompt.

To Run the 'Shutdown' command from the command prompt, go to 'Start > Run', type 'cmd', and press 'Enter'.
In the black box (the command prompt) type 'Shutdown' and the Switches you want to use with the 'Shutdown' command.
You have to use at least one switch for the shutdown command to work.

The Switches :-
The 'Shutdown' command has a few options called Switches. You can always see them by typing 'shutdown -?' in the command prompt if you forget any of them.

-i: Display GUI interface, must be the first option
-l: Log off (cannot be used with -m option)
-s: Shutdown the computer
-r: Shutdown and restart the computer
-a: Abort a system shutdown
-m \\computername: Remote computer to shutdown/restart/abort
-t xx: Set timeout for shutdown to xx seconds
-c “comment”: Shutdown comment (maximum of 127 characters)
-f: Forces running applications to close without warning
-d [u][p]:xx:yy: The reason code for the shutdown u is the user code p is a planned shutdown code xx is the major reason code (positive integer less than 256) yy is the minor reason code (positive integer less than 65536)

Note :- I’ve noticed using a switch with a '-' sign doesn’t work sometimes.
If you are having trouble try using a '/' in place of '-' in your switches.

Examples :-
shutdown –m \\computername –r –f
This command will restart the computer named computername and force any programs that might still be running to stop.

shutdown –m \\computername –r –f –c “I’m restarting your computer. Please save your work now.” –t 120
This command will restart the computer named computername, force any programs that might still be running to stop, give to user on that computer a message, and countdown 120 seconds before it restarts.

shutdown –m \\computername –a
This command will abort a previous shutdown command that is in progress.

Using A Batch File :-
You can create a file that performs the shutdown command on many computers at one time.

In this example I’m going to create a batch file that will use the shutdown command to shut down 3 computers on my home network before I go to bed.

Open 'Notepad' and type the shutdown command to shut down a computer for each computer on the network.
Make sure each shutdown command is on its own line.
An example of what should be typed in notepad is given below-

shutdown –m \\computer1 –s
shutdown –m \\computer2 –s
shutdown –m \\computer3 -s

Now I’ll save it as a batch file by going to file, save as, change save as type to all files, give the file a name ending with '.bat'. I named mine 'shutdown.bat'.
Pick the location to save the batch file in and save it.

When you run the batch file it’ll shutdown computer 1, 2, and 3 for you.

You can use any combination of shutdown commands in a batch file.
 

Advertise

Friends list

  • CA's easy-to-use security suite lacks sufficient protection to stop many of today's threats. Don't rely on it.A cursory look at CA Internet Security 2008 m...

Term of Use:

Disclaimer : The Contents Of this Site is Only for Knowledge Purpose, Do not use this in a wrong way.

Hacker's Alley Copyright © 2009 This template is Designed by Ipietoon. Sponsored by Hacker's Alley