How to change your IP address in less than a minute? The following trick gives you a step-by-step procedure to change your IP address.
(Note : This trick is only for Win. XP users)
Follow these tricks :
Press Windows key + R to open 'run' or else Click "Start" (located in the Left of the Taskbar). Then click on "Run"
Type cmd and click OK. You should now be at an MSDOS prompt screen.
Type ipconfig /release in a promt screen, and press Enter key.
Now type exit or close the prompt screen
Right-click on “Network Places” or “My Network Places” on your desktop.
Click on Properties
You should now be on a screen with something titled Local Area Connection, or something close to that.
Right click on Local Area Network & click properties
Double-click on the Internet Protocol (TCP/IP) from the list under the General tab.
Click on Use the following IP address under the General tab.
Create an IP address (It doesn’t matter what it is. I just type 1 and 2 until i fill the area up).
Press Tab key . It will automatically fill in the Subnet Mask section with default numbers.
And Click OK here
Click the OK button again.You should now be back on the Local Area Connection screen.
Right-click back on Local Area Connection and go to properties again.
Again go to the TCP/IP settings.
Now this time, You have to select Obtain an IP address automatically.
Click OK
Click OK again
Congratulations, You now have a New IP Address.
NOTE : Some ISPs (Internet Service Providers) does'nt support this kind of prosedure. There is a chance to get back the old IP. So, This case You need switch off the Modem and on it to get back the New IP Address.
A webcam knows many uses. Obviously, it can be used for video conferencing, or recording your ambitious YouTube videos and responses. However, that’s not all.
we’ll show you how you can use your webcam for Wii-like gaming!
Wait…..what? Using your webcam for Wii-like gaming? A Wii doesn’t even have a webcam!
So How Does It Work?
You’re completely right. However, we’re not at all planning on recording ourselves. It’s more like we’ll be recording objects and will be using the camera’s motion sensing ability to transform these into intuitive ‘controllers’.
That’s right, using the CamSpace software, you can transform nearly any object to an input device! Just check out the video below to see it at work.
You can use cardboard steering wheels for racing games, playing swords for fighting games, and a chicken drumstick for flight simulators!
The implementation also works a lot smoother than would be expected. You’ll need Windows for the software, and about any webcam can be used, though older webcams tend to work less well due to a lower frame-rate and problems with light adjustments.
Installing The CamSpace Software
The software is currently Windows only - though it definately deserves to be ported to both Mac and Linux - and can be downloaded here. Also make sure you’ve properly installed your webcam.
You can test out CamSpace by playing one of the CamSpace games. These are small mini-games that accompanied CamSpace. You ought to be able to find them in a folder on your desktop as well.
Item Recognition
CamSpace recognizes specific items by their shape and colour. In theory, you can use any object you want. However, you might want to avoid objects that have the colour of your skin or clothes and use obvious colours - like bright green or pink - instead.
The program will ask you to specify what item you intend to use by holding it in a specific area of the screen. You can also trigger the lock-function by pressing ‘Shift + ~‘ .CamSpace will now track your object so you can use it for simple interaction. It will monitor the size and rotation and will hereby determine the exact location of the item.
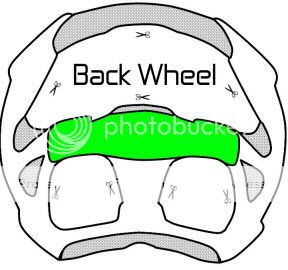
You’ll also be able to find several steering wheel templates on the site, this’ll save you some work and give you a general idea of what’s needed.
Playing Games
You can play any game with CamSpace, but to do so you’ll need a controller.
A controller specifies what in-game action is paired up with which motion. As you might’ve guessed, each controller is game specific.
You can either download one of the controllers that are developed by other people here, or make one yourself and upload it to the CamSpace developer site.
Making a Controller
Making a controller is relatively easy. You can start making one by opening CamSpace and selecting ‘Create New Controller’ under Developer Tools in the right-click menu.
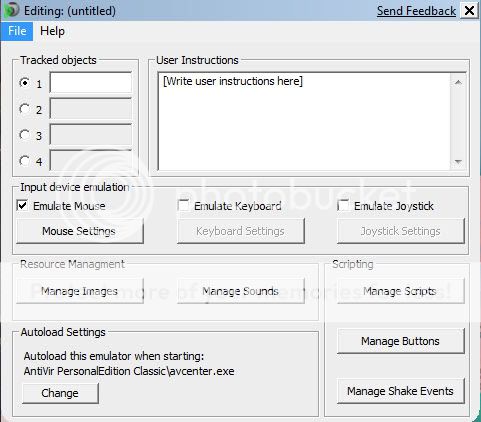
If you then choose to edit your script (also located under Developer Tools), an editing window will pop up.
In this window you’ll be able to specify which action pairs up with which function easily. Scripting shouldn’t be necessary with basic controllers.
Scroll to top will be a good feature for your blog if you are having a big page! As if someone has scrolled down to bottom then he/she really has to scroll much to make his/her way to the top! So why dont we give them an Automated option for this. As you can see here in hacker's alley I have added a automated scroll to top button at the very end of the page.
Follow these steps. &. Lets get started :
Download this zipped file here (Only 45 kb) this file contains two .js files, Which are important. It also contains somes images to make you interested.
Now unzip or Extract the file. Now you can upload a arrow which you like. You can upload a image in photobucket(Default image is in the above image)
(This step is Not compulsory if you like the default image) Open the scrolltopcontrol.js with notepad ( I use notepad++. you can download it from here. ) And search for this line
Obviously you need to change the coloured portion according to your account!
Click on preview and see if the scroll button is coming or not! If not then revise the procedure and if it is coming then save your template anddddd you have a good smooth scroll to top button at your blogger
How to Show Blogger Widget Only In Home Page Or Post Pages of blogger,as you have seen in wordpress blog its your wish to what widget and what add you want to show in sidebar of that page but this service cant be used in blogger as all sidebar bar widgets are linked to all pages in blogger including home page but now you can select the option which sidebar widget you want to show in blogger homepage and which one in all other blogger post pages.
As one more beautiful hack how to show only post titles in blogger home and label pages has also been released,dont forget to red about it.
Lets follow on this tutorial i.e how to show blogger widget only in home page or blogger posts pages.
Add the widget in blogger layout where you want to display in blogger.Now you wnt to select on which pages of blogger it should be displayed.
Now go to "Edit HTML" page. Mark "Expand Widget Templates"
And Search for
<b:widget id='HTML3' locked='false' title='Your Title name you gave to your widget' type='HTML'>
The number in red can be any like 1,2,3,4 it depends on your no of widget your are adding but the title to the widget you gave will be same.
So to make the widget code find easily for you find the below word
<b:widget id='HTML
and you will find many codes like these so keep on matchng the title name of widget of them to which you want to show on different pages.
After finding the code of widget you want to display on different pages add the red codes to them as i have shown below.
To display the any Blogger widget only in HomePage
<b:widget id='HTML5' locked='false' title='Widget Title Name' type='HTML'> <b:includable id='main'> <b:if cond='data:blog.url == data:blog.homepageUrl'> <!-- only display title if it's non-empty --> <b:if cond='data:title != ""'> <h2 class='title'><data:title/></h2> </b:if> <div class='widget-content'> <data:content/> </div>
Display Scripts and css codes Between Blogger Posts Have you tried using scripts in blogger posts.If not you can check by posting it as they are not visible in posts. But now you can post these scripts with css codes in to the blogger posts.
For these scripts to display :
Just Follow These steps to add this " Post Styling Hack " to your Blog . Step 1 :
Login to your Blogger account and navigate to Layout section . Then go to Edit Html Tab.
Step 2 : Add This CSS code above this ]]></b:skin>
I found out recently that the old reflexorator that i've posted here can't be used anymore. So i browse around and i found the solution. 1) Download the keygen from here
2) Follow these instructions:
Step One - Download game and install (but of course) Step Two - Open the “R.A.A-P.C.exe” Step Three - Click on “Unwrap” Step Four - (If unwrapping) Click on the game EXE. It will want to save it as “(Game)-Unwrapped.exe” which is fine. Step five - Go to the game folder and change the original game EXE to (example) “(Game)old.exe” and make the unwrapped EXE to the original EXE name. Step Six - Click on game and have fun.
I tried it just now on mytribe game, and it works! THANKS TO SALAMANDRA!
This crack is for Norton Internet Security 2009 & Norton AntiVirus 2009 version 16.5.0.134. It doesn't work on version before 16.0.0.125. This crack will convert a 15-Day into a 90-Day Trial and resets the trial period every time you start your computer. It was tested on WinXP (x86) & Vista (x86/x64).
Installation: 1. Install Norton Internet Security or Antivirus 2009. (If already installed then skip to step 2.) 2. Execute the crack and follow the instructions. 3. To remove, just execute the program again and select [NO] to initiate the Uninstall.
Note: Vista64 users may have to [install] version 16.5.0.134 directly and not use a patched update to version 16.5.0.
Thanks for BOX This Trail reset Cracked by BOX! (v2.2A)
Hello, well below trick is working great on yahoo messenger 9 version. I have tried this method and there is no yahoo ad on my messenger. It is a trick , the yahoo messenger pick the ad from this url insider.msg.yahoo.com . So, if you try the below trick the local host will block this url and no yahoo ad will appear on yahoo messenger interface. Its working good in yahoo messenger 9 version, havent tried on lower yahoo messenger versions.
Steps For Removing These Kind Of Ads From Yahoo! Messenger:-
* Close Yahoo! Messenger * Go To " C:\WINDOWS\system32\drivers\etc " * Open The File Named "hosts" In Notepad Or Any Other Editors * After The Line 127.0.0.1 localhost Add 127.0.0.1 insider.msg.yahoo.com * Restart Windows.
yea.. Just browsing through the internet this morning and found this cool trick with Google Images and want to share it with you guys! 1. First go to Google Images : images.google.com
2. Search for anything you want like "flowers , cats , dogs,etc"
3. Next, you'll see lot of image thumbnails as usual...
4. Now, here is the trick : Just copy and paste this code in your address bar and press Enter. See what happens.. (surprise for you... )
CA's easy-to-use security suite lacks sufficient protection to stop many of
today's threats. Don't rely on it.A cursory look at CA Internet Security
2008 m...
Term of Use:
Disclaimer : The Contents Of this Site is Only for Knowledge Purpose, Do not use this in a wrong way.




 ) this file contains two .js files, Which are important. It also contains somes images to make you interested.


 "
"


